Vulnerability Pages (ULTIMATE)
Introduced in GitLab Ultimate 13.0.
Each vulnerability in a project has a Vulnerability Page. This page contains details of the vulnerability. The details included vary according to the type of vulnerability. Details of each vulnerability include:
- Description
- When it was detected
- Current status
- Available actions
- Linked issues
- Actions log
On the vulnerability's page, you can:
- Change the vulnerability's status.
- Create an issue.
- Link issues to the vulnerability.
- Resolve a vulnerability, if a solution is available.
Vulnerability status values
A vulnerability's status can be one of the following:
| Status | Description |
|---|---|
| Detected | The default state for a newly discovered vulnerability. |
| Confirmed | A user has seen this vulnerability and confirmed it to be accurate. |
| Dismissed | A user has seen this vulnerability and dismissed it because it is not accurate or otherwise not to be resolved. |
| Resolved | The vulnerability has been fixed and is no longer valid. |
Change vulnerability status
To change a vulnerability's status, select a new value from the Status dropdown then select Change status. Optionally, add a comment to the log entry at the bottom of the page.
Create an issue for a vulnerability
From a vulnerability's page you can create an issue to track all action taken to resolve or mitigate it.
You can create either:
- A GitLab issue (default).
- A Jira issue.
Creating a Jira issue requires that Jira integration is enabled on the project. Note that when Jira integration is enabled, the GitLab issue feature is not available.
Create a GitLab issue for a vulnerability
To create a GitLab issue for a vulnerability:
- In GitLab, go to the vulnerability's page.
- Select Create issue.
An issue is created in the project, pre-populated with information from the vulnerability report. The issue is then opened so you can take further action.
Create a Jira issue for a vulnerability
- Introduced in GitLab 13.9.
- Feature flag removed in GitLab 13.12.
Prerequisites:
- Enable Jira integration. The Enable Jira issues creation from vulnerabilities option must be selected as part of the configuration.
- Each user must have a personal Jira user account with permission to create issues in the target project.
To create a Jira issue for a vulnerability:
- Go to the vulnerability's page.
- Select Create Jira issue.
- If you're not already logged in to Jira, log in.
The Jira issue is created and opened in a new browser tab. The Summary and Description fields are pre-populated from the vulnerability's details.
Unlike GitLab issues, the status of whether a Jira issue is open or closed does not display in the GitLab user interface.
Linked issues
NOTE: If Jira issue support is enabled, GitLab issues are disabled so this feature is not available.
You can link one or more existing GitLab issues to a vulnerability. Adding a link helps track the issue that resolves or mitigates a vulnerability.
Issues linked to a vulnerability are shown in the Vulnerability Report and the vulnerability's page.
Be aware of the following conditions between a vulnerability and a linked issue:
- The vulnerability page shows related issues, but the issue page doesn't show the vulnerability it's related to.
- An issue can only be related to one vulnerability at a time.
- Issues can be linked across groups and projects.
Link to existing issues
To link a vulnerability to existing issues:
- Go to the vulnerability's page.
- In the Linked issues section, select the plus icon ({plus}).
- For each issue to be linked, either:
- Paste a link to the issue.
- Enter the issue's ID (prefixed with a hash
#).
- Select Add.
The selected issues are added to the Linked issues section, and the linked issues counter is updated.
Resolve a vulnerability
For some vulnerabilities a solution is already known. In those instances, a vulnerability's page includes a Resolve with merge request option.
To resolve a vulnerability, you can either:
The following scanners are supported:
-
Dependency Scanning.
Automatic Patch creation is only available for Node.js projects managed with
yarn. - Container Scanning.
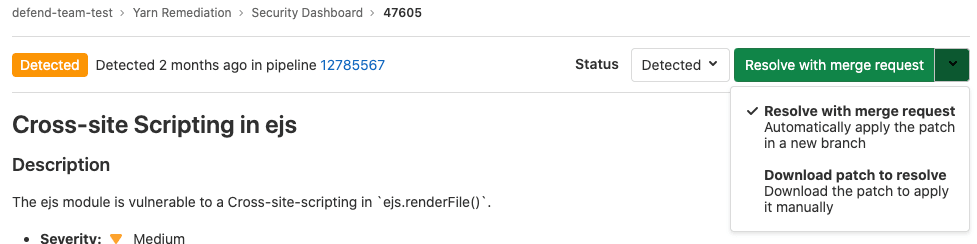
Resolve a vulnerability with a merge request
To resolve the vulnerability with a merge request, go to the vulnerability's page and from the Resolve with merge request dropdown select Resolve with merge request.
A merge request is created which applies the patch required to resolve the vulnerability. Process the merge request according to your standard workflow.
Resolve a vulnerability manually
To manually apply the patch that GitLab generated for a vulnerability:
- Go to the vulnerability's page and from the Resolve with merge request dropdown select Download patch to resolve.
- Ensure your local project has the same commit checked out that was used to generate the patch.
- Run
git apply remediation.patch. - Verify and commit the changes to your branch.
Vulnerability scanner maintenance
The following vulnerability scanners and their databases are regularly updated:
| Secure scanning tool | Vulnerabilities database updates |
|---|---|
| Container Scanning | A job runs on a daily basis to build new images with the latest vulnerability database updates from the upstream scanner. |
| Dependency Scanning | Relies on bundler-audit (for Ruby gems), retire.js (for npm packages), and gemnasium (the GitLab tool for all libraries). Both bundler-audit and retire.js fetch their vulnerabilities data from GitHub repositories, so vulnerabilities added to ruby-advisory-db and retire.js are immediately available. The tools themselves are updated once per month if there's a new version. The Gemnasium DB is updated at least once a week. See our current measurement of time from CVE being issued to our product being updated. |
| Dynamic Application Security Testing (DAST) | The scanning engine is updated on a periodic basis. See the version of the underlying tool zaproxy. The scanning rules are downloaded at scan runtime. |
| Static Application Security Testing (SAST) | Relies exclusively on the tools GitLab wraps. The underlying analyzers are updated at least once per month if a relevant update is available. The vulnerabilities database is updated by the upstream tools. |
You do not have to update GitLab to benefit from the latest vulnerabilities definitions. The security tools are released as Docker images. The vendored job definitions that enable them use major release tags according to semantic versioning. Each new release of the tools overrides these tags. The Docker images are updated to match the previous GitLab releases. Although you automatically get the latest versions of the scanning tools, there are some known issues with this approach.