Dynamic Application Security Testing (DAST) (ULTIMATE)
If you deploy your web application into a new environment, your application may become exposed to new types of attacks. For example, misconfigurations of your application server or incorrect assumptions about security controls may not be visible from the source code.
Dynamic Application Security Testing (DAST) examines applications for vulnerabilities like these in deployed environments. DAST uses the open source tool OWASP Zed Attack Proxy for analysis.
After DAST creates its report, GitLab evaluates it for discovered vulnerabilities between the source and target branches. Relevant findings are noted in the merge request.
The comparison logic uses only the latest pipeline executed for the target branch's base commit. Running the pipeline on other commits has no effect on the merge request.
NOTE: To learn how four of the top six attacks were application-based and how to protect your organization, download our "A Seismic Shift in Application Security" whitepaper.
DAST application analysis
DAST can analyze applications in two ways:
- Passive scan only (DAST default). DAST executes ZAP's Baseline Scan and doesn't actively attack your application.
- Passive and active scan. DAST can be configured to also perform an active scan to attack your application and produce a more extensive security report. It can be very useful when combined with Review Apps.
NOTE: A pipeline may consist of multiple jobs, including SAST and DAST scanning. If any job fails to finish for any reason, the security dashboard doesn't show DAST scanner output. For example, if the DAST job finishes but the SAST job fails, the security dashboard doesn't show DAST results. On failure, the analyzer outputs an exit code.
Prerequisites
-
GitLab Runner available, with the
dockerexecutor. - Target application deployed. For more details, read Deployment options.
Deployment options
Depending on the complexity of the target application, there are a few options as to how to deploy and configure the DAST template. We provided a set of example applications with their configurations in our DAST demonstrations project.
Review Apps
Review Apps are the most involved method of deploying your DAST target application. To assist in the process, we created a Review App deployment using Google Kubernetes Engine (GKE). This example can be found in our Review Apps - GKE project, along with detailed instructions in the README.md on how to configure Review Apps for DAST.
Docker Services
If your application utilizes Docker containers you have another option for deploying and scanning with DAST. After your Docker build job completes and your image is added to your container registry, you can use the image as a service.
By using service definitions in your gitlab-ci.yml, you can scan services with the DAST analyzer.
stages:
  - build
  - dast

include:
  - template: DAST.gitlab-ci.yml

# Deploys the container to the GitLab container registry
deploy:
  services:
  - name: docker:dind
    alias: dind
  image: docker:19.03.5
  stage: build
  script:
    - docker login -u gitlab-ci-token -p $CI_JOB_TOKEN $CI_REGISTRY
    - docker pull $CI_REGISTRY_IMAGE:latest || true
    - docker build --tag $CI_REGISTRY_IMAGE:$CI_COMMIT_SHA --tag $CI_REGISTRY_IMAGE:latest .
    - docker push $CI_REGISTRY_IMAGE:$CI_COMMIT_SHA
    - docker push $CI_REGISTRY_IMAGE:latest

services: # use services to link your app container to the dast job
  - name: $CI_REGISTRY_IMAGE:$CI_COMMIT_SHA
    alias: yourapp

variables:
  DAST_FULL_SCAN_ENABLED: "true" # do a full scan
  DAST_ZAP_USE_AJAX_SPIDER: "true" # use the ajax spider
Most applications depend on multiple services such as databases or caching services. By default, services defined in the services fields cannot communicate
with each another. To allow communication between services, enable the FF_NETWORK_PER_BUILD feature flag.
variables:
  FF_NETWORK_PER_BUILD: "true" # enable network per build so all services can communicate on the same network

services: # use services to link the container to the dast job
  - name: mongo:latest
    alias: mongo
  - name: $CI_REGISTRY_IMAGE:$CI_COMMIT_SHA
    alias: yourapp
DAST run options
You can use DAST to examine your web application:
- Automatically, initiated by a merge request.
- Manually, initiated on demand.
Some of the differences between these run options:
| Automatic scan | On-demand scan |
|---|---|
| DAST scan is initiated by a merge request. | DAST scan is initiated manually, outside the DevOps life cycle. |
CI/CD variables are sourced from .gitlab-ci.yml. |
CI/CD variables are provided in the UI. |
| All DAST CI/CD variables available. | Subset of DAST CI/CD variables available. |
DAST.gitlab-ci.yml template. |
DAST-On-Demand-Scan.gitlab-ci.yml template. |
Enable automatic DAST run
To enable DAST to run automatically, either:
- Enable Auto DAST (provided by Auto DevOps).
-
Include the DAST template in your existing
.gitlab-ci.ymlfile.
DAST job order
When using the DAST.gitlab-ci.yml template, the dast stage is run last as shown in
the example below. To ensure DAST scans the latest code, deploy your application
in a stage before the dast stage.
  stages:
    - build
    - test
    - deploy
    - dast
Be aware that if your pipeline is configured to deploy to the same webserver in each run, running a pipeline while another is still running could cause a race condition where one pipeline overwrites the code from another pipeline. The site to be scanned should be excluded from changes for the duration of a DAST scan. The only changes to the site should be from the DAST scanner. Be aware that any changes that users, scheduled tasks, database changes, code changes, other pipelines, or other scanners make to the site during a scan could lead to inaccurate results.
Include the DAST template
This template was updated to DAST_VERSION: 2 in GitLab 14.0.
If you want to manually add DAST to your application, the DAST job is defined in a CI/CD template file. Updates to the template are provided with GitLab upgrades, allowing you to benefit from any improvements and additions.
To include the DAST template:
-
Select the CI/CD template you want to use:
-
DAST.gitlab-ci.yml: Stable version of the DAST CI/CD template. -
DAST.latest.gitlab-ci.yml: Latest version of the DAST template. (Introduced in GitLab 13.8).
WARNING: The latest version of the template may include breaking changes. Use the stable template unless you need a feature provided only in the latest template.
For more information about template versioning, see the CI/CD documentation.
-
-
Add a
daststage to your GitLab CI stages configuration:stages: - dast -
Add the template to GitLab, based on your version of GitLab:
-
In GitLab 11.9 and later, include the template by adding the following to your
.gitlab-ci.ymlfile:include: - template: <template_file.yml> variables: DAST_WEBSITE: https://example.com -
In GitLab 11.8 and earlier, add the contents of the template to your
.gitlab_ci.ymlfile.
-
-
Define the URL to be scanned by DAST by using one of these methods:
-
Set the
DAST_WEBSITECI/CD variable. If set, this value takes precedence. -
Add the URL in an
environment_url.txtfile at the root of your project. This is useful for testing in dynamic environments. To run DAST against an application dynamically created during a GitLab CI/CD pipeline, a job that runs prior to the DAST scan must persist the application's domain in anenvironment_url.txtfile. DAST automatically parses theenvironment_url.txtfile to find its scan target.For example, in a job that runs prior to DAST, you could include code that looks similar to:
script:
  - echo http://${CI_PROJECT_ID}-${CI_ENVIRONMENT_SLUG}.domain.com > environment_url.txt
artifacts:
  paths: [environment_url.txt]
  when: always
You can see an example of this in our Auto DevOps CI YAML file.
-
The included template creates a dast job in your CI/CD pipeline and scans
your project's running application for possible vulnerabilities.
The results are saved as a DAST report artifact that you can later download and analyze. Due to implementation limitations, we always take the latest DAST artifact available. Behind the scenes, the GitLab DAST Docker image is used to run the tests on the specified URL and scan it for possible vulnerabilities.
By default, the DAST template uses the latest major version of the DAST Docker
image. Using the DAST_VERSION variable, you can choose how DAST updates:
- Automatically update DAST with new features and fixes by pinning to a major
version (such as
1). - Only update fixes by pinning to a minor version (such as
1.6). - Prevent all updates by pinning to a specific version (such as
1.6.4).
Find the latest DAST versions on the Releases page.
Crawling web applications dependent on JavaScript
GitLab has released a new browser-based crawler, an add-on to DAST that uses a browser to crawl web applications for content. This crawler replaces the standard DAST Spider and Ajax Crawler, and uses the same authentication mechanisms as a normal DAST scan.
The browser-based crawler crawls websites by browsing web pages as a user would. This approach works well with web applications that make heavy use of JavaScript, such as Single Page Applications.
For more details, including setup instructions, see DAST browser-based crawler.
Full scan
DAST can be configured to perform ZAP Full Scan, which includes both passive and active scanning against the same target website:
include:
  - template: DAST.gitlab-ci.yml

variables:
  DAST_FULL_SCAN_ENABLED: "true"
If your DAST job exceeds the job timeout and you need to reduce the scan duration, we shared some tips for optimizing DAST scans in a blog post.
API scan
- Introduced in GitLab Ultimate 12.10.
- A new DAST API scanning engine was introduced in GitLab Ultimate 13.10.
Using an API specification as a scan's target is a useful way to seed URLs for scanning an API. Vulnerability rules in an API scan are different than those in a normal website scan.
A new DAST API scanning engine is available in GitLab 13.12 and later. For more details, see DAST API scanning engine. The new scanning engine supports REST, SOAP, GraphQL, and generic APIs using forms, XML, and JSON. Testing can be performed using OpenAPI, Postman Collections, and HTTP Archive (HAR) documents.
Specification format
API scans support OpenAPI V2 and OpenAPI V3 specifications. You can define these specifications using JSON or YAML.
Import API specification from a URL
If your API specification is accessible at a URL, you can pass that URL in directly as the target. The specification does not have to be hosted on the same host as the API being tested.
include:
  - template: DAST.gitlab-ci.yml

variables:
  DAST_API_OPENAPI: http://my.api/api-specification.yml
Import API specification from a file
If your API specification file is in your repository, you can provide its filename as the target.
The API specification file must be in the /zap/wrk directory.
dast:
  before_script:
    - mkdir -p /zap/wrk
    - cp api-specification.yml /zap/wrk/api-specification.yml
  variables:
    GIT_STRATEGY: fetch
    DAST_API_OPENAPI: api-specification.yml
Full API scan
API scans support full scanning, which can be enabled by using the DAST_FULL_SCAN_ENABLED
CI/CD variable. Domain validation is not supported for full API scans.
Host override
Specifications often define a host, which contains a domain name and a port. The
host referenced may be different than the host of the API's review instance.
This can cause incorrect URLs to be imported, or a scan on an incorrect host.
Use the DAST_API_HOST_OVERRIDE CI/CD variable to override these values.
WARNING:
When using the API host override feature, you cannot use the $DAST_WEBSITE variable to override the hostname.
A host override is only supported when importing the API specification from a URL. Attempts to override the
host throw an error when the API specification is imported from a file. This is due to a limitation in the
ZAP OpenAPI extension.
For example, with a OpenAPI V3 specification containing:
servers:
  - url: https://api.host.com
If the test version of the API is running at https://api-test.host.com, then
the following DAST configuration can be used:
include:
  - template: DAST.gitlab-ci.yml

variables:
  DAST_API_OPENAPI: http://api-test.host.com/api-specification.yml
  DAST_API_HOST_OVERRIDE: api-test.host.com
Authentication using headers
Tokens in request headers are often used as a way to authenticate API requests.
You can achieve this by using the DAST_REQUEST_HEADERS CI/CD variable.
Headers are applied to every request DAST makes.
include:
  - template: DAST.gitlab-ci.yml

variables:
  DAST_API_OPENAPI: http://api-test.api.com/api-specification.yml
  DAST_REQUEST_HEADERS: "Authorization: Bearer my.token"
URL scan
- Introduced in GitLab Ultimate 13.4.
- Improved in GitLab 13.11.
A URL scan allows you to specify which parts of a website are scanned by DAST.
Define the URLs to scan
URLs to scan can be specified by either of the following methods:
- Use
DAST_PATHS_FILECI/CD variable to specify the name of a file containing the paths. - Use
DAST_PATHSvariable to list the paths.
Use DAST_PATHS_FILE CI/CD variable
Introduced in GitLab 13.6.
To define the URLs to scan in a file, create a plain text file with one path per line.
page1.html
/page2.html
category/shoes/page1.html
To scan the URLs in that file, set the CI/CD variable DAST_PATHS_FILE to the path of that file.
The file can be checked into the project repository or generated as an artifact by a job that
runs before DAST.
By default, DAST scans do not clone the project repository. Instruct the DAST job to clone
the project by setting GIT_STRATEGY to fetch. Give a file path relative to CI_PROJECT_DIR to DAST_PATHS_FILE.
include:
  - template: DAST.gitlab-ci.yml

variables:
  GIT_STRATEGY: fetch
  DAST_PATHS_FILE: url_file.txt  # url_file.txt lives in the root directory of the project
Use DAST_PATHS CI/CD variable
Introduced in GitLab 13.4.
To specify the paths to scan in a CI/CD variable, add a comma-separated list of the paths to the DAST_PATHS
variable. Note that you can only scan paths of a single host.
include:
  - template: DAST.gitlab-ci.yml

variables:
  DAST_PATHS: "/page1.html,/category1/page1.html,/page3.html"
When using DAST_PATHS and DAST_PATHS_FILE, note the following:
-
DAST_WEBSITEmust be defined when using eitherDAST_PATHS_FILEorDAST_PATHS. The paths listed in either useDAST_WEBSITEto build the URLs to scan - Spidering is disabled when
DAST_PATHSorDAST_PATHS_FILEare defined -
DAST_PATHS_FILEandDAST_PATHScan not be used together - The
DAST_PATHSvariable has a limit of about 130kb. If you have a list or paths greater than this, useDAST_PATHS_FILE.
Full Scan
To perform a full scan on the listed paths, use the DAST_FULL_SCAN_ENABLED CI/CD variable.
View details of a vulnerability detected by DAST
Introduced in GitLab Ultimate 13.1.
Vulnerabilities detected by DAST occur in the live web application. Addressing these types of vulnerabilities requires specific information. DAST provides the information required to investigate and rectify the underlying cause.
To view details of vulnerabilities detected by DAST:
-
To see all vulnerabilities detected, either:
- Go to your project and select Security & Compliance.
- Go to the merge request and select the Security tab.
-
Select a vulnerability's description. The following details are provided:
Field Description Description Description of the vulnerability. Project Namespace and project in which the vulnerability was detected. Method HTTP method used to detect the vulnerability. URL URL at which the vulnerability was detected. Request Headers Headers of the request. Response Status Response status received from the application. Response Headers Headers of the response received from the application. Evidence Evidence of the data found that verified the vulnerability. Often a snippet of the request or response, this can be used to help verify that the finding is a vulnerability. Identifiers Identifiers of the vulnerability. Severity Severity of the vulnerability. Scanner Type Type of vulnerability report. Links Links to further details of the detected vulnerability. Solution Details of a recommended solution to the vulnerability (optional).
Customizing the DAST settings
WARNING:
Beginning in GitLab 13.0, the use of only and except
is no longer supported. When overriding the template, you must use rules instead.
The DAST settings can be changed through CI/CD variables by using the
variables parameter in .gitlab-ci.yml.
These variables are documented in available variables.
For example:
include:
  - template: DAST.gitlab-ci.yml

variables:
  DAST_WEBSITE: https://example.com
  DAST_SPIDER_MINS: 120
Because the template is evaluated before the pipeline configuration, the last mention of the variable takes precedence.
Enabling and disabling rules
A complete list of the rules that DAST uses to scan for vulnerabilities can be found in the ZAP docs.
DAST_EXCLUDE_RULES disables the rules with the given IDs.
DAST_ONLY_INCLUDE_RULES restricts the set of rules used in the scan to
those with the given IDs.
DAST_EXCLUDE_RULES and DAST_ONLY_INCLUDE_RULES are mutually exclusive and a
DAST scan with both configured exits with an error.
By default, several rules are disabled because they either take a long time to run or frequently generate false positives. The complete list of disabled rules can be found in exclude_rules.yml.
Hide sensitive information
Introduced in GitLab 13.1.
HTTP request and response headers may contain sensitive information, including cookies and authorization credentials. By default, the following headers are masked:
-
Authorization. -
Proxy-Authorization. -
Set-Cookie(values only). -
Cookie(values only).
Using the DAST_MASK_HTTP_HEADERS CI/CD variable, you can list the
headers whose values you want masked. For details on how to mask headers, see
Customizing the DAST settings.
Authentication
NOTE: We highly recommend you configure the scanner to authenticate to the application. If you don't, it cannot check most of the application for security risks, as most of your application is likely not accessible without authentication. We also recommend you periodically confirm the scanner's authentication is still working, as this tends to break over time due to authentication changes to the application.
Create masked CI/CD variables to pass the credentials that DAST uses.
To create masked variables for the username and password, see Create a custom variable in the UI.
The key of the username variable must be DAST_USERNAME,
and the key of the password variable must be DAST_PASSWORD.
After DAST has authenticated with the application, all cookies are collected from the web browser. For each cookie a matching session token is created for use by ZAP. This ensures ZAP is recognized by the application as correctly authenticated.
Authentication supports single form logins, multi-step login forms, and authenticating to URLs outside of the configured target URL.
Variables that are related to authenticated scans are:
include:
  - template: DAST.gitlab-ci.yml

dast:
  variables:
    DAST_WEBSITE: "https://example.com"
    DAST_AUTH_URL: "https://login.example.com/"
    DAST_USERNAME: "admin"
    DAST_PASSWORD: "P@55w0rd!"
    DAST_USERNAME_FIELD: "name:username" # a selector describing the element containing the username field at the sign-in HTML form
    DAST_PASSWORD_FIELD: "id:password" # a selector describing the element containing the password field at the sign-in HTML form
    DAST_FIRST_SUBMIT_FIELD: "css:button[type='user-submit']" # optional, the selector of the element that when clicked will submit the username form of a multi-page login process
    DAST_SUBMIT_FIELD: "css:button[type='submit']" # the selector of the element that when clicked will submit the login form or the password form of a multi-page login process
    DAST_EXCLUDE_URLS: "http://example.com/sign-out"  # optional, URLs to skip during the authenticated scan; comma-separated, no spaces in between
    DAST_AUTH_VERIFICATION_URL: "http://example.com/loggedin_page"  # optional, used to verify authentication is successful by expecting this URL once the login form has been submitted
    DAST_AUTH_VERIFICATION_SELECTOR: "css:.user-profile" # optional, used to verify authentication is successful by expecting a selector to be present on the page once the login form has been submitted
    DAST_AUTH_VERIFICATION_LOGIN_FORM: "true" # optional, used to verify authentication is successful by ensuring there are no login forms on the page once the login form has been submitted
    DAST_AUTH_REPORT: "true" # optionally output an authentication debug report
WARNING: NEVER run an authenticated scan against a production server. When an authenticated scan is run, it may perform any function that the authenticated user can. This includes actions like modifying and deleting data, submitting forms, and following links. Only run an authenticated scan against a test server.
Log in using automatic detection of the login form
By providing a DAST_USERNAME, DAST_PASSWORD, and DAST_AUTH_URL, DAST will attempt to authenticate to the
target application by locating the login form based on a determination about whether or not the form contains username or password fields.
Automatic detection is "best-effort", and depending on the application being scanned may provide either a resilient login experience or one that fails to authenticate the user.
Login process:
- The
DAST_AUTH_URLis loaded into the browser, and any forms on the page are located.- If a form contains a username and password field,
DAST_USERNAMEandDAST_PASSWORDis inputted into the respective fields, the form submit button is clicked and the user is logged in. - If a form contains only a username field, it is assumed that the login form is multi-step.
- The
DAST_USERNAMEis inputted into the username field and the form submit button is clicked. - The subsequent pages loads where it is expected that a form exists and contains a password field. If found,
DAST_PASSWORDis inputted, form submit button is clicked and the user is logged in.
- The
- If a form contains a username and password field,
Log in using explicit selection of the login form
By providing a DAST_USERNAME_FIELD, DAST_PASSWORD_FIELD, and DAST_SUBMIT_FIELD, in addition to the fields required for automatic login,
DAST will attempt to authenticate to the target application by locating the login form based on the selectors provided.
Most applications will benefit from this approach to authentication.
Login process:
- The
DAST_AUTH_URLis loaded into the browser, and any forms on the page are located.- If the
DAST_FIRST_SUBMIT_FIELDis not defined, thenDAST_USERNAMEis inputted intoDAST_USERNAME_FIELD,DAST_PASSWORDis inputted intoDAST_PASSWORD_FIELD,DAST_SUBMIT_FIELDis clicked and the user is logged in. - If the
DAST_FIRST_SUBMIT_FIELDis defined, then it is assumed that the login form is multi-step.- The
DAST_USERNAMEis inputted into theDAST_USERNAME_FIELDfield and theDAST_FIRST_SUBMIT_FIELDis clicked. - The subsequent pages loads where the
DAST_PASSWORDis inputted into theDAST_PASSWORD_FIELDfield, theDAST_SUBMIT_FIELDis clicked and the user is logged in.
- The
- If the
Verifying successful login
Once the login form has been submitted, DAST determines if the login was successful. Unsuccessful attempts at authentication cause the scan to halt.
Following the submission of the login form, authentication is determined to be unsuccessful when:
- A
400or500series HTTP response status code is returned. - A new cookie/browser storage value determined to be sufficiently random has not been set.
In addition to these checks, the user can configure their own verification checks. Each of the following checks can be used in conjunction with one another, if none are configured by default the presence of a login form is checked.
Verifying based on the URL
When DAST_AUTH_VERIFICATION_URL is configured, the URL displayed in the browser tab post login form submission is directly compared to the URL in the CI/CD variable.
If these are not exactly the same, authentication is deemed to be unsuccessful.
For example:
include:
  - template: DAST.gitlab-ci.yml

dast:
  variables:
    DAST_WEBSITE: "https://example.com"
    ...
    DAST_AUTH_VERIFICATION_URL: "https://example.com/user/welcome"
Verify based on presence of an element
When DAST_AUTH_VERIFICATION_SELECTOR is configured, the page displayed in the browser tab is searched for an element described by the selector in the CI/CD variable.
If no element is found, authentication is deemed to be unsuccessful.
For example:
include:
  - template: DAST.gitlab-ci.yml

dast:
  variables:
    DAST_WEBSITE: "https://example.com"
    ...
    DAST_AUTH_VERIFICATION_SELECTOR: "css:.welcome-user"
Verify based on presence of a login form
When DAST_AUTH_VERIFICATION_LOGIN_FORM is configured, the page displayed in the browser tab is searched for a form that is detected to be a login form.
If any such form is found, authentication is deemed to be unsuccessful.
For example:
include:
  - template: DAST.gitlab-ci.yml

dast:
  variables:
    DAST_WEBSITE: "https://example.com"
    ...
    DAST_AUTH_VERIFICATION_LOGIN_FORM: "true"
Configure the authentication debug output
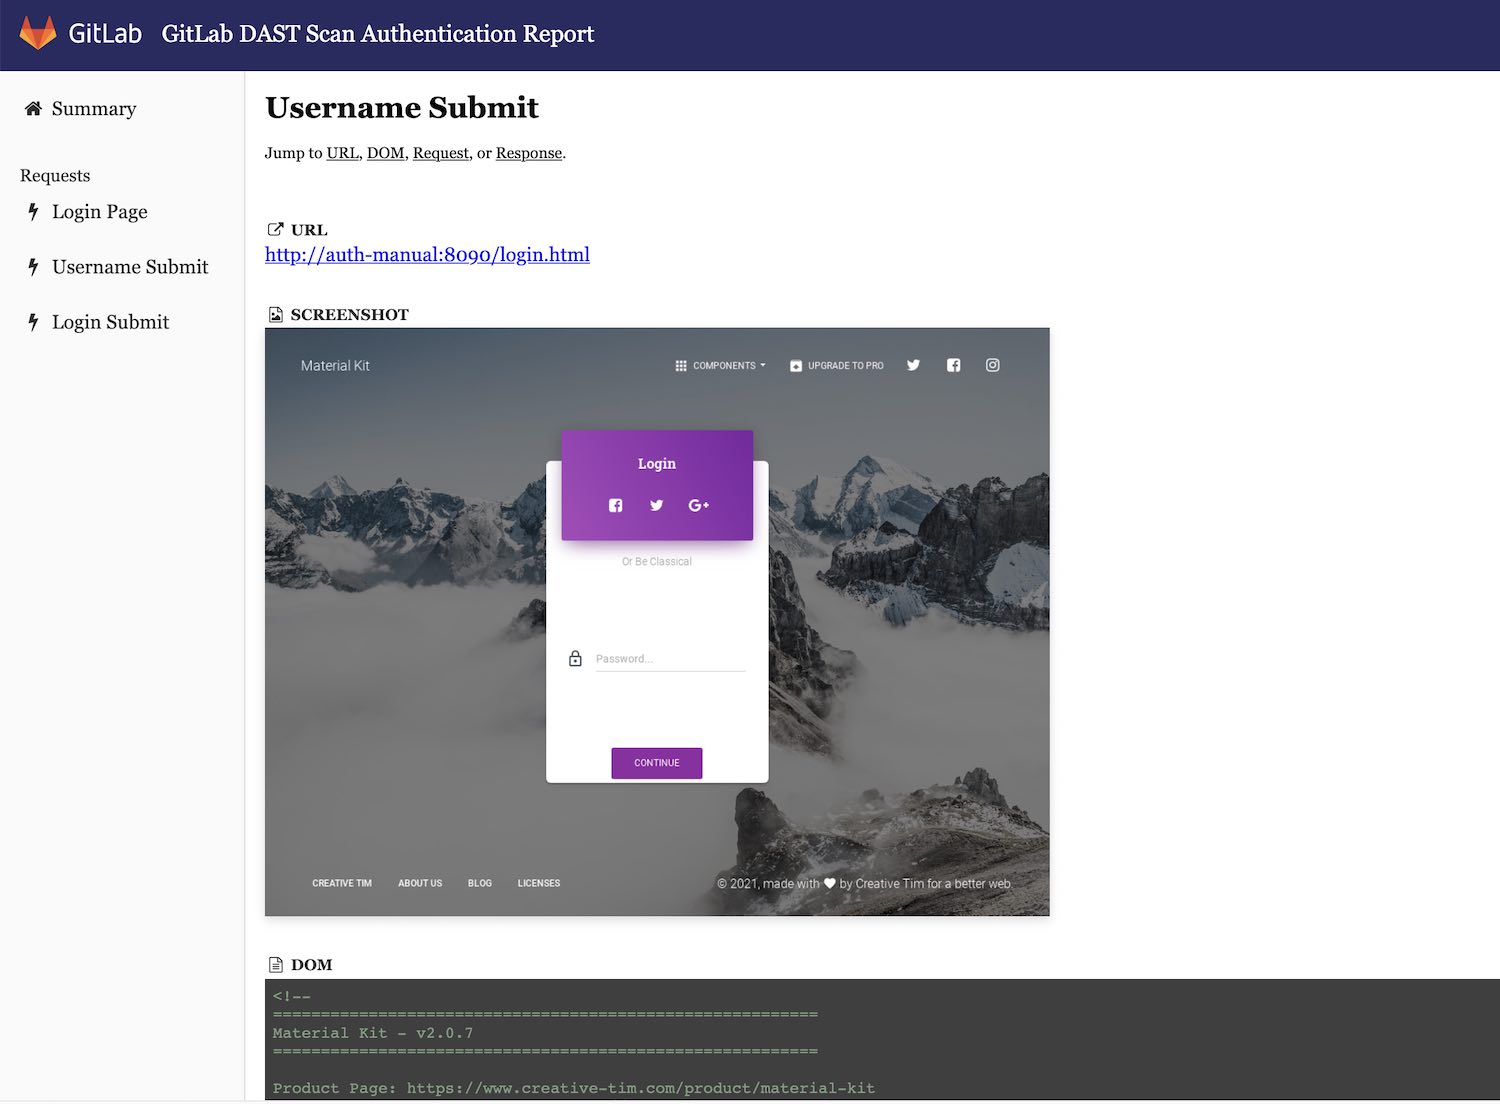
It is often difficult to understand the cause of an authentication failure when running DAST in a CI/CD pipeline. To assist users in debugging authentication issues, a debug report can be generated and saved as a job artifact. This HTML report contains all steps made during the login process, along with HTTP requests and responses, the Document Object Model (DOM) and screenshots.
An example configuration where the authentication debug report is exported may look like the following:
dast:
  variables:
    DAST_WEBSITE: "https://example.com"
    ...
    DAST_AUTH_REPORT: "true"
  artifacts:
    paths: [gl-dast-debug-auth-report.html]
Available CI/CD variables
DAST can be configured using CI/CD variables.
| CI/CD variable | Type | Description |
|---|---|---|
SECURE_ANALYZERS_PREFIX |
URL | Set the Docker registry base address from which to download the analyzer. |
DAST_WEBSITE (1) |
URL | The URL of the website to scan. DAST_API_OPENAPI must be specified if this is omitted. |
DAST_API_OPENAPI |
URL or string | The API specification to import. The specification can be hosted at a URL, or the name of a file present in the /zap/wrk directory. DAST_WEBSITE must be specified if this is omitted. |
DAST_API_SPECIFICATION (1) |
URL or string |
Deprecated in GitLab 13.12 and replaced by DAST_API_OPENAPI. To be removed in GitLab 15.0. The API specification to import. The specification can be hosted at a URL, or the name of a file present in the /zap/wrk directory. DAST_WEBSITE must be specified if this is omitted. |
DAST_SPIDER_START_AT_HOST |
boolean | Set to false to prevent DAST from resetting the target to its host before scanning. When true, non-host targets http://test.site/some_path is reset to http://test.site before scan. Default: false. Introduced in GitLab 13.6. |
DAST_AUTH_URL (1) |
URL | The URL of the page containing the sign-in HTML form on the target website. DAST_USERNAME and DAST_PASSWORD are submitted with the login form to create an authenticated scan. Not supported for API scans. |
DAST_AUTH_VERIFICATION_URL (1) |
URL | A URL only accessible to logged in users that DAST can use to confirm successful authentication. If provided, DAST exits if it cannot access the URL. Introduced in GitLab 13.8. |
DAST_USERNAME (1) |
string | The username to enter into the username field on the sign-in HTML form. |
DAST_PASSWORD (1) |
string | The password to enter into the password field on the sign-in HTML form. |
DAST_USERNAME_FIELD (1) |
selector | A selector describing the username field on the sign-in HTML form. Example: id:user
|
DAST_PASSWORD_FIELD (1) |
selector | A selector describing the password field on the sign-in HTML form. Example: css:.password-field
|
DAST_SKIP_TARGET_CHECK |
boolean | Set to true to prevent DAST from checking that the target is available before scanning. Default: false. Introduced in GitLab 13.8. |
DAST_MASK_HTTP_HEADERS |
string | Comma-separated list of request and response headers to be masked (GitLab 13.1). Must contain all headers to be masked. Refer to list of headers that are masked by default. |
DAST_EXCLUDE_URLS (1) |
URLs | The URLs to skip during the authenticated scan; comma-separated. Regular expression syntax can be used to match multiple URLs. For example, .* matches an arbitrary character sequence. Not supported for API scans. |
DAST_FULL_SCAN_ENABLED (1) |
boolean | Set to true to run a ZAP Full Scan instead of a ZAP Baseline Scan. Default: false
|
DAST_AUTO_UPDATE_ADDONS |
boolean | ZAP add-ons are pinned to specific versions in the DAST Docker image. Set to true to download the latest versions when the scan starts. Default: false
|
DAST_API_HOST_OVERRIDE (1) |
string | Used to override domains defined in API specification files. Only supported when importing the API specification from a URL. Example: example.com:8080
|
DAST_EXCLUDE_RULES |
string | Set to a comma-separated list of Vulnerability Rule IDs to exclude them from running during the scan. Rule IDs are numbers and can be found from the DAST log or on the ZAP project. For example, HTTP Parameter Override has a rule ID of 10026. Cannot be used when DAST_ONLY_INCLUDE_RULES is set. Note: In earlier versions of GitLab the excluded rules were executed but vulnerabilities they generated were suppressed. Introduced in GitLab 12.10. |
DAST_ONLY_INCLUDE_RULES |
string | Set to a comma-separated list of Vulnerability Rule IDs to configure the scan to run only them. Rule IDs are numbers and can be found from the DAST log or on the ZAP project. Cannot be used when DAST_EXCLUDE_RULES is set. Introduced in GitLab 13.12. |
DAST_REQUEST_HEADERS (1) |
string | Set to a comma-separated list of request header names and values. Headers are added to every request made by DAST. For example, Cache-control: no-cache,User-Agent: DAST/1.0
|
DAST_DEBUG (1) |
boolean | Enable debug message output. Default: false. Introduced in GitLab 13.1. |
DAST_TARGET_AVAILABILITY_TIMEOUT (1) |
number | Time limit in seconds to wait for target availability. |
DAST_SPIDER_MINS (1) |
number | The maximum duration of the spider scan in minutes. Set to 0 for unlimited. Default: One minute, or unlimited when the scan is a full scan. Introduced in GitLab 13.1. |
DAST_HTML_REPORT |
string | The filename of the HTML report written at the end of a scan. Introduced in GitLab 13.1. |
DAST_MARKDOWN_REPORT |
string | The filename of the Markdown report written at the end of a scan. Introduced in GitLab 13.1. |
DAST_XML_REPORT |
string | The filename of the XML report written at the end of a scan. Introduced in GitLab 13.1. |
DAST_INCLUDE_ALPHA_VULNERABILITIES |
boolean | Set to true to include alpha passive and active scan rules. Default: false. Introduced in GitLab 13.1. |
DAST_USE_AJAX_SPIDER (1) |
boolean | Set to true to use the AJAX spider in addition to the traditional spider, useful for crawling sites that require JavaScript. Default: false. Introduced in GitLab 13.1. |
DAST_PATHS |
string | Set to a comma-separated list of URLs for DAST to scan. For example, /page1.html,/category1/page3.html,/page2.html. Introduced in GitLab 13.4. |
DAST_PATHS_FILE |
string | The file path containing the paths within DAST_WEBSITE to scan. The file must be plain text with one path per line. Introduced in GitLab 13.6. |
DAST_SUBMIT_FIELD |
selector | A selector describing the element that when clicked submits the login form, or the password form of a multi-page login process. Example: xpath://input[@value='Login']. Introduced in GitLab 12.4. |
DAST_FIRST_SUBMIT_FIELD |
selector | A selector describing the element that when clicked submits the username form of a multi-page login process. Example: .submit. Introduced in GitLab 12.4. |
DAST_ZAP_CLI_OPTIONS |
string | ZAP server command-line options. For example, -Xmx3072m would set the Java maximum memory allocation pool size. Introduced in GitLab 13.1. |
DAST_ZAP_LOG_CONFIGURATION |
string | Set to a semicolon-separated list of additional log4j properties for the ZAP Server. For example, log4j.logger.org.parosproxy.paros.network.HttpSender=DEBUG;log4j.logger.com.crawljax=DEBUG
|
DAST_AGGREGATE_VULNERABILITIES |
boolean | Vulnerability aggregation is set to true by default. To disable this feature and see each vulnerability individually set to false. Introduced in GitLab 14.0. |
DAST_MAX_URLS_PER_VULNERABILITY |
number | The maximum number of URLs reported for a single vulnerability. DAST_MAX_URLS_PER_VULNERABILITY is set to 50 by default. To list all the URLs set to 0. Introduced in GitLab 13.12. |
DAST_AUTH_REPORT |
boolean | Used in combination with exporting the gl-dast-debug-auth-report.html artifact to aid in debugging authentication issues. |
DAST_AUTH_VERIFICATION_SELECTOR |
selector | Verifies successful authentication by checking for presence of a selector once the login form has been submitted. Example: css:.user-photo
|
DAST_AUTH_VERIFICATION_LOGIN_FORM |
boolean | Verifies successful authentication by checking for the lack of a login form once the login form has been submitted. |
- DAST CI/CD variable available to an on-demand scan.
Selectors
Selectors are used by CI/CD variables to specify the location of an element displayed on a page in a browser.
Selectors have the format type:search string. The crawler will search for the selector using the search string based on the type.
| Selector type | Example | Description |
|---|---|---|
css |
css:.password-field |
Searches for a HTML element having the supplied CSS selector. Selectors should be as specific as possible for performance reasons. |
id |
id:element |
Searches for an HTML element with the provided element ID. |
name |
name:element |
Searches for an HTML element with the provided element name. |
xpath |
xpath://input[@id="my-button"]/a |
Searches for a HTML element with the provided XPath. Note that XPath searches are expected to be less performant than other searches. |
| None provided | a.click-me |
Defaults to searching using a CSS selector. |
Find selectors with Google Chrome
Chrome DevTools element selector tool is an effective way to find a selector.
- Open Chrome and navigate to the page where you would like to find a selector, for example, the login page for your site.
- Open the
Elementstab in Chrome DevTools with the keyboard shortcutCommand + Shift + cin macOS orCtrl + Shift + cin Windows. - Select the
Select an element in the page to select ittool.
- Select the field on your page that you would like to know the selector for.
- Once the tool is active, highlight a field you wish to view the details of.
- Once highlighted, you can see the element's details, including attributes that would make a good candidate for a selector.
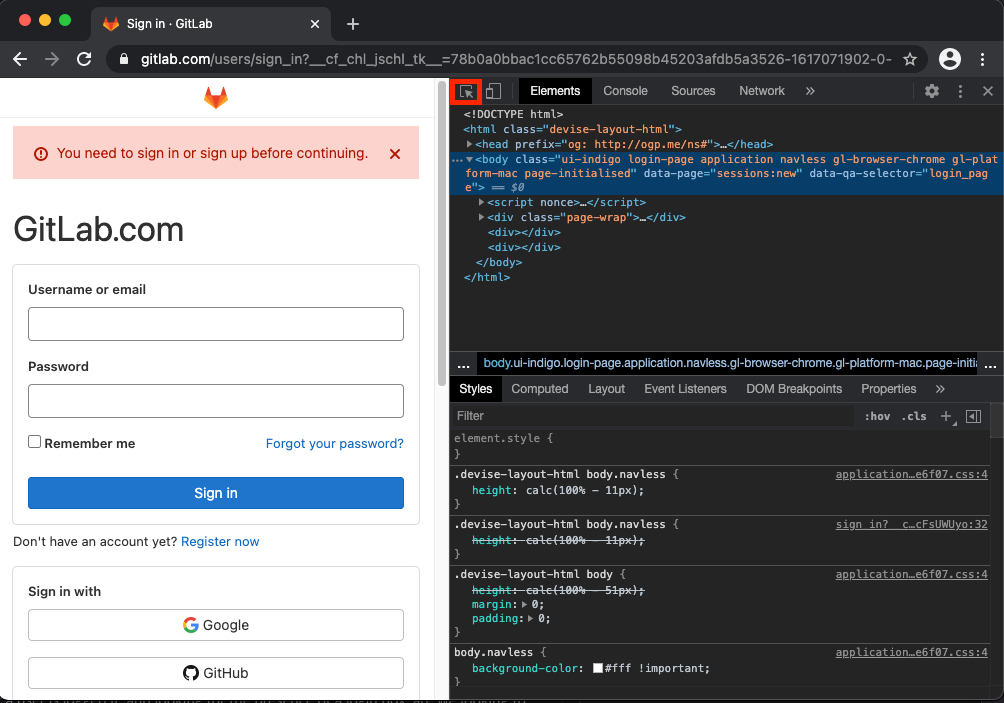
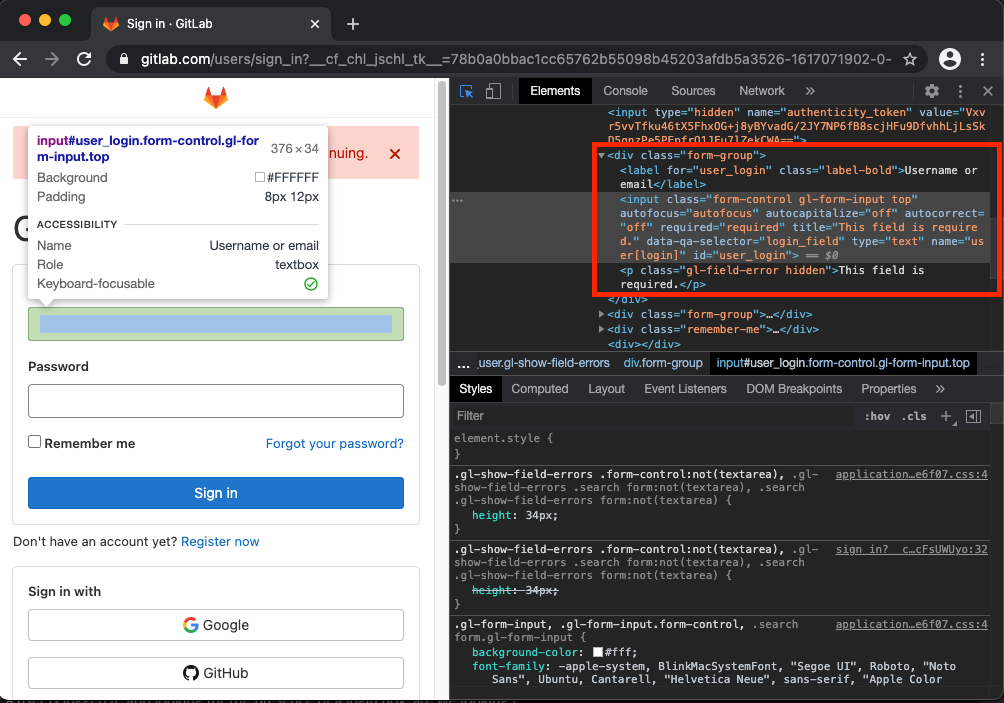
In this example, the id="user_login" appears to be a good candidate. You can use this as a selector as the DAST username field by setting DAST_USERNAME_FIELD: "css:[id=user_login]", or more simply, DAST_USERNAME_FIELD: "id:user_login".
Choose the right selector
Judicious choice of selector leads to a scan that is resilient to the application changing.
In order of preference, it is recommended to choose as selectors:
-
idfields. These are generally unique on a page, and rarely change. -
namefields. These are generally unique on a page, and rarely change. -
classvalues specific to the field, such as the selector"css:.username"for theusernameclass on the username field. - Presence of field specific data attributes, such as the selector,
"css:[data-username]"when thedata-usernamefield has any value on the username field. - Multiple
classhierarchy values, such as the selector"css:.login-form .username"when there are multiple elements with classusernamebut only one nested inside the element with the classlogin-form.
When using selectors to locate specific fields we recommend you avoid searching on:
- Any
id,name,attribute,classorvaluethat is dynamically generated. - Generic class names, such as
column-10anddark-grey. - XPath searches as they are less performant than other selector searches.
- Unscoped searches, such as those beginning with
css:*andxpath://*.
DAST command-line options
Not all DAST configuration is available via CI/CD variables. To find out all possible options, run the following configuration. Available command-line options are printed to the job log:
include:
  template: DAST.gitlab-ci.yml

dast:
  script:
    - /analyze --help
You must then overwrite the script command to pass in the appropriate
argument. For example, vulnerability definitions in alpha can be included with
-a. The following configuration includes those definitions:
include:
  template: DAST.gitlab-ci.yml

dast:
  script:
    - export DAST_WEBSITE=${DAST_WEBSITE:-$(cat environment_url.txt)}
    - /analyze -a -t $DAST_WEBSITE
Custom ZAProxy configuration
The ZAProxy server contains many useful configurable values.
Many key/values for -config remain undocumented, but there is an untested list of
possible keys.
Note that these options are not supported by DAST, and may break the DAST scan
when used. An example of how to rewrite the Authorization header value with TOKEN follows:
include:
  template: DAST.gitlab-ci.yml

variables:
  DAST_ZAP_CLI_OPTIONS: "-config replacer.full_list(0).description=auth -config replacer.full_list(0).enabled=true -config replacer.full_list(0).matchtype=REQ_HEADER -config replacer.full_list(0).matchstr=Authorization -config replacer.full_list(0).regex=false -config replacer.full_list(0).replacement=TOKEN"
Bleeding-edge vulnerability definitions
ZAP first creates rules in the alpha class. After a testing period with
the community, they are promoted to beta. DAST uses beta definitions by
default. To request alpha definitions, use the
DAST_INCLUDE_ALPHA_VULNERABILITIES CI/CD variable as shown in the
following configuration:
include:
  template: DAST.gitlab-ci.yml

variables:
  DAST_INCLUDE_ALPHA_VULNERABILITIES: "true"
Cloning the project's repository
The DAST job does not require the project's repository to be present when running, so by default
GIT_STRATEGY is set to none.
Debugging DAST jobs
A DAST job has two executing processes:
- The ZAP server.
- A series of scripts that start, control and stop the ZAP server.
Debug mode of the scripts can be enabled by using the DAST_DEBUG CI/CD variable. This can help when troubleshooting the job,
and outputs statements indicating what percentage of the scan is complete.
For details on using variables, see Overriding the DAST template.
Debug mode of the ZAP server can be enabled using the DAST_ZAP_LOG_CONFIGURATION variable.
The following table outlines examples of values that can be set and the effect that they have on the output that is logged.
Multiple values can be specified, separated by semicolons.
| Log configuration value | Effect |
|---|---|
log4j.rootLogger=DEBUG |
Enable all debug logging statements. |
log4j.logger.org.apache.commons.httpclient=DEBUG |
Log every HTTP request and response made by the ZAP server. |
log4j.logger.org.zaproxy.zap.spider.SpiderController=DEBUG |
Log URLs found during the spider scan of the target. |
log4j.logger.com.crawljax=DEBUG |
Enable Ajax Crawler debug logging statements. |
log4j.logger.org.parosproxy.paros=DEBUG |
Enable ZAP server proxy debug logging statements. |
log4j.logger.org.zaproxy.zap=DEBUG |
Enable debug logging statements of the general ZAP server code. |
Running DAST in an offline environment
For self-managed GitLab instances in an environment with limited, restricted, or intermittent access to external resources through the internet, some adjustments are required for the DAST job to successfully run. For more information, see Offline environments.
Requirements for offline DAST support
To use DAST in an offline environment, you need:
- GitLab Runner with the
dockerorkubernetesexecutor. - Docker Container Registry with a locally available copy of the DAST container image, found in the DAST container registry.
Note that GitLab Runner has a default pull policy of always,
meaning the runner tries to pull Docker images from the GitLab container registry even if a local
copy is available. The GitLab Runner pull_policy can be set to if-not-present
in an offline environment if you prefer using only locally available Docker images. However, we
recommend keeping the pull policy setting to always if not in an offline environment, as this
enables the use of updated scanners in your CI/CD pipelines.
Make GitLab DAST analyzer images available inside your Docker registry
For DAST, import the following default DAST analyzer image from registry.gitlab.com to your local Docker container registry:
registry.gitlab.com/gitlab-org/security-products/dast:latest
The process for importing Docker images into a local offline Docker registry depends on your network security policy. Please consult your IT staff to find an accepted and approved process by which external resources can be imported or temporarily accessed. These scanners are periodically updated with new definitions, and you may be able to make occasional updates on your own.
For details on saving and transporting Docker images as a file, see Docker's documentation on
docker save,
docker load,
docker export, and
docker import.
Set DAST CI/CD job variables to use local DAST analyzers
Add the following configuration to your .gitlab-ci.yml file. You must replace image to refer to
the DAST Docker image hosted on your local Docker container registry:
include:
  - template: DAST.gitlab-ci.yml
dast:
  image: registry.example.com/namespace/dast:latest
The DAST job should now use local copies of the DAST analyzers to scan your code and generate security reports without requiring internet access.
Alternatively, you can use the CI/CD variable SECURE_ANALYZERS_PREFIX to override the base registry address of the dast image.
On-demand scans
- Introduced in GitLab 13.2.
- Improved in GitLab 13.3.
- The saved scans feature was introduced in GitLab 13.9.
- The option to select a branch was introduced in GitLab 13.10.
- DAST branch selection feature flag removed in GitLab 13.11.
An on-demand DAST scan runs outside the DevOps life cycle. Changes in your repository don't trigger the scan. You must start it manually.
An on-demand DAST scan:
- Can run a specific combination of a site profile and a scanner profile.
- Is associated with your project's default branch.
- Is saved on creation so it can be run later.
In GitLab 13.10 and later, you can select to run an on-demand scan against a specific branch.
On-demand scan modes
An on-demand scan can be run in active or passive mode:
- Passive mode is the default and runs a ZAP Baseline Scan.
- Active mode runs a ZAP Full Scan which is potentially harmful to the site being scanned. To minimize the risk of accidental damage, running an active scan requires a validated site profile.
Run an on-demand DAST scan
NOTE: You must have permission to run an on-demand DAST scan against a protected branch. The default branch is automatically protected. For more information, see Pipeline security on protected branches.
Prerequisites:
- A scanner profile.
- A site profile.
- If you are running an active scan the site profile must be validated.
To run an on-demand scan, either:
Create and run an on-demand scan
- From your project's home page, go to Security & Compliance > On-demand Scans in the left sidebar.
- Complete the Scan name and Description fields.
- In GitLab 13.10 and later, select the desired branch from the Branch dropdown.
- In Scanner profile, select a scanner profile from the dropdown.
- In Site profile, select a site profile from the dropdown.
- To run the on-demand scan now, select Save and run scan. Otherwise select Save scan to run it later.
The on-demand DAST scan runs and the project's dashboard shows the results.
List saved on-demand scans
To list saved on-demand scans:
- From your project's home page, go to Security & Compliance > Configuration.
- Select the Saved Scans tab.
View details of an on-demand scan
To view details of an on-demand scan:
- From your project's home page, go to Security & Compliance > Configuration.
- Select Manage DAST scans.
- Select Manage in the DAST Profiles row.
- Select the Saved Scans tab.
- In the saved scan's row select More actions ({ellipsis_v}), then select Edit.
Run a saved on-demand scan
To run a saved on-demand scan:
-
From your project's home page, go to Security & Compliance > Configuration.
-
Select Manage DAST scans.
-
Select Manage in the DAST Profiles row.
-
Select the Saved Scans tab.
-
In the scan's row select Run scan.
If the branch saved in the scan no longer exists, you must first edit the scan, select a new branch, and save the edited scan.
The on-demand DAST scan runs and the project's dashboard shows the results.
Edit an on-demand scan
To edit an on-demand scan:
- From your project's home page, go to Security & Compliance > Configuration.
- Select Manage DAST scans.
- Select Manage in the DAST Profiles row.
- Select the Saved Scans tab.
- In the saved scan's row select More actions ({ellipsis_v}), then select Edit.
- Edit the form.
- Select Save scan.
Delete an on-demand scan
To delete an on-demand scan:
- From your project's home page, go to Security & Compliance > Configuration.
- Select Manage DAST scans.
- Select Manage in the DAST Profiles row.
- Select the Saved Scans tab.
- In the saved scan's row select More actions ({ellipsis_v}), then select Delete.
- Select Delete to confirm the deletion.
Site profile
A site profile describes the attributes of a web site to scan on demand with DAST. A site profile is required for an on-demand DAST scan.
A site profile contains the following:
- Profile name: A name you assign to the site to be scanned.
- Site type: The type of target to be scanned, either website or API scan.
- Target URL: The URL that DAST runs against.
- Excluded URLs: A comma-separated list of URLs to exclude from the scan.
- Request headers: A comma-separated list of HTTP request headers, including names and values. These headers are added to every request made by DAST.
-
Authentication:
- Authenticated URL: The URL of the page containing the sign-in HTML form on the target website. The username and password are submitted with the login form to create an authenticated scan.
- Username: The username used to authenticate to the website.
- Password: The password used to authenticate to the website.
- Username form field: The name of username field at the sign-in HTML form.
- Password form field: The name of password field at the sign-in HTML form.
When an API site type is selected, a host override is used to ensure the API being scanned is on the same host as the target. This is done to reduce the risk of running an active scan against the wrong API.
Site profile validation
Introduced in GitLab 13.8.
Site profile validation reduces the risk of running an active scan against the wrong website. A site must be validated before an active scan can run against it. The site validation methods are as follows:
- Text file validation requires a text file be uploaded to the target site. The text file is allocated a name and content that is unique to the project. The validation process checks the file's content.
-
Header validation requires the header
Gitlab-On-Demand-DASTbe added to the target site, with a value unique to the project. The validation process checks that the header is present, and checks its value.
Both methods are equivalent in functionality. Use whichever is feasible.
Create a site profile
To create a site profile:
- From your project's home page, go to Security & Compliance > Configuration.
- Select Manage in the DAST Profiles row.
- Select New > Site Profile.
- Complete the fields then select Save profile.
The site profile is created.
Edit a site profile
To edit an existing site profile:
- From your project's home page, go to Security & Compliance > Configuration.
- In the DAST Profiles row select Manage.
- Select the Site Profiles tab.
- In the profile's row select the More actions ({ellipsis_v}) menu, then select Edit.
- Edit the fields then select Save profile.
If a site profile is linked to a security policy, a user cannot edit the profile from this page. See Scan Policies for more information.
Delete a site profile
To delete an existing site profile:
- From your project's home page, go to Security & Compliance > Configuration.
- In the DAST Profiles row select Manage.
- Select the Site Profiles tab.
- In the profile's row select the More actions ({ellipsis_v}) menu, then select Delete.
- Select Delete to confirm the deletion.
If a site profile is linked to a security policy, a user cannot delete the profile from this page. See Scan Policies for more information.
Validate a site profile
Prerequisites:
- A site profile.
To validate a site profile:
- From your project's home page, go to Security & Compliance > Configuration.
- In the DAST Profiles row select Manage.
- Select the Site Profiles tab.
- In the profile's row select Validate or Retry validation.
- Select the validation method.
- For Text file validation:
- Download the validation file listed in Step 2.
- Upload the validation file to the host. Upload the file to the location in Step 3 or any location you prefer.
- Select Validate.
- For Header validation:
- Select the clipboard icon in Step 2.
- Edit the header of the site to validate, and paste the clipboard content.
- Select the input field in Step 3 and enter the location of the header.
- Select Validate.
- For Text file validation:
The site is validated and an active scan can run against it.
If a validated site profile's target URL is edited, the site's validation status is revoked.
Revoke a site profile's validation status
Note that all site profiles with the same URL have their validation status revoked.
To revoke a site profile's validation status:
- From your project's home page, go to Security & Compliance > Configuration.
- In the DAST Profiles row select Manage.
- Select Revoke validation beside the validated profile.
The site profile's validation status is revoked.
Validated site profile headers
The following are code samples of how you can provide the required site profile header in your application.
Ruby on Rails example for on-demand scan
Here's how you can add a custom header in a Ruby on Rails application:
class DastWebsiteTargetController < ActionController::Base
  def dast_website_target
    response.headers['Gitlab-On-Demand-DAST'] = '0dd79c9a-7b29-4e26-a815-eaaf53fcab1c'
    head :ok
  end
end
Django example for on-demand scan
Here's how you can add a custom header in Django:
class DastWebsiteTargetView(View):
    def head(self, *args, **kwargs):
      response = HttpResponse()
      response['Gitlab-On-Demand-DAST'] = '0dd79c9a-7b29-4e26-a815-eaaf53fcab1c'

      return response
Node (with Express) example for on-demand scan
Here's how you can add a custom header in Node (with Express):
app.get('/dast-website-target', function(req, res) {
  res.append('Gitlab-On-Demand-DAST', '0dd79c9a-7b29-4e26-a815-eaaf53fcab1c')
  res.send('Respond to DAST ping')
})
Scanner profile
- Introduced in GitLab 13.4.
- Added in GitLab 13.5: scan mode, AJAX spider, debug messages.
A scanner profile defines the scanner settings used to run an on-demand scan:
- Profile name: A name you give the scanner profile. For example, "Spider_15".
- Scan mode: A passive scan monitors all HTTP messages (requests and responses) sent to the target. An active scan attacks the target to find potential vulnerabilities.
- Spider timeout: The maximum number of minutes allowed for the spider to traverse the site.
- Target timeout: The maximum number of seconds DAST waits for the site to be available before starting the scan.
- AJAX spider: Run the AJAX spider, in addition to the traditional spider, to crawl the target site.
- Debug messages: Include debug messages in the DAST console output.
Create a scanner profile
To create a scanner profile:
- From your project's home page, go to Security & Compliance > Configuration.
- In the DAST Profiles row select Manage.
- Select New > Scanner Profile.
- Complete the form. For details of each field, see Scanner profile.
- Click Save profile.
Edit a scanner profile
To edit a scanner profile:
- From your project's home page, go to Security & Compliance > Configuration.
- Click Manage in the DAST Profiles row.
- Select the Scanner Profiles tab.
- In the scanner's row select the More actions ({ellipsis_v}) menu, then select Edit.
- Edit the form.
- Select Save profile.
If a scanner profile is linked to a security policy, a user cannot edit the profile from this page. See Scan Policies for more information.
Delete a scanner profile
To delete a scanner profile:
- From your project's home page, go to Security & Compliance > Configuration.
- Click Manage in the DAST Profiles row.
- Select the Scanner Profiles tab.
- In the scanner's row select the More actions ({ellipsis_v}) menu, then select Delete.
- Select Delete.
If a scanner profile is linked to a security policy, a user cannot delete the profile from this page. See Scan Policies for more information.
Reports
The DAST tool outputs a report file in JSON format by default. However, this tool can also generate reports in Markdown, HTML, and XML. For more information, see the schema for DAST reports.
List of URLs scanned
When DAST completes scanning, the merge request page states the number of URLs scanned. Click View details to view the web console output which includes the list of scanned URLs.

JSON
WARNING: The JSON report artifacts are not a public API of DAST and their format is expected to change in the future.
The DAST tool always emits a JSON report file called gl-dast-report.json and
sample reports can be found in the
DAST repository.
Other formats
Reports can also be generated in Markdown, HTML, and XML. These can be published as artifacts using the following configuration:
include:
  template: DAST.gitlab-ci.yml

dast:
  variables:
    DAST_HTML_REPORT: report.html
    DAST_MARKDOWN_REPORT: report.md
    DAST_XML_REPORT: report.xml
  artifacts:
    paths:
      - $DAST_HTML_REPORT
      - $DAST_MARKDOWN_REPORT
      - $DAST_XML_REPORT
      - gl-dast-report.json
Optimizing DAST
By default, DAST downloads all artifacts defined by previous jobs in the pipeline. If
your DAST job does not rely on environment_url.txt to define the URL under test or any other files created
in previous jobs, we recommend you don't download artifacts. To avoid downloading
artifacts, add the following to your gitlab-ci.yml file:
dast:
   dependencies: []